VTI Install: Unterschied zwischen den Versionen
Torai (Diskussion | Beiträge) (Die Seite wurde neu angelegt: „Um deine Vu+ Box mit einem anderen, bzw. neuen Image auszustatten, benötigt man ein sogenanntes Image. Es gibt 2 Arten von Images, die USB Variante und das se…“) |
Torai (Diskussion | Beiträge) |
||
| Zeile 1: | Zeile 1: | ||
| − | + | To equip your Vu + box with a different, and new image, you need as we call it "Image". There are 2 versions of images ,the USB one, and serial flash (NFI). | |
| − | == | + | == How to upgrade the Vu+ Ultimo image via USB == |
| − | * | + | *Save the image on the PC (USB version) |
| − | * | + | *Unzip files |
| − | *USB | + | *Format USB flash drive with the file system FAT,or FAT32 |
| − | * | + | *Create on the stick : Directory/vuplus/ultimo |
| − | * | + | *Copy to the stick the 4 files into :Directory/vuplus/ultimo |
| − | *VU+ STB | + | *Power off VU+ STB |
| − | * | + | *Remove all USB devices from the box |
| − | *USB Stick | + | *Plug-in the USB Stick into Vu+ Box |
| − | *VU+ STB | + | *Turn on the VU+ STB |
| − | *"-" | + | *Press the button "-" on front of the Ultimo |
| − | * | + | *Wait for "Finished, Removing USB" message |
| − | *USB Stick | + | *Unplug the USB Stick from the box |
| − | *VU+ STB | + | *Power off the VU+ STB , and restart it again |
| − | == | + | == How to upgrade the Vu+ Uno image via USB == |
| − | * | + | *Save the image on the PC (USB version) |
| − | * | + | *Unzip files |
| − | *USB | + | *Format USB flash drive with the file system FAT,or FAT32 |
| − | * | + | *Create on the stick : Directory/vuplus/uno |
| − | * | + | *Copy to the stick the 4 files into :Directory/vuplus/uno |
| − | *VU+ STB | + | *Power off VU+ STB |
| − | * | + | *Remove all USB devices from the box |
| − | *USB Stick | + | *Plug-in the USB Stick into Vu+ Box |
| − | *VU+ STB | + | *Turn on the VU+ STB |
| − | *"-" | + | *Press the button "-" on front of the Uno |
| − | * | + | *Wait for "Finished, Removing USB" message |
| − | *USB Stick | + | *Unplug the USB Stick from the box |
| − | *VU+ STB | + | *Power off the VU+ STB , and restart it again |
| − | == | + | == How to upgrade the Vu+ Duo / Vu+ Duo LE image via USB == |
| − | * | + | *Save the image on the PC (USB version) |
| − | * | + | *Unzip files |
| − | *USB | + | *Format USB flash drive with the file system FAT,or FAT32 |
| − | * | + | *Create on the stick : Directory/vuplus/duo |
| − | * | + | *Copy to the stick the 3 files into :Directory/vuplus/duo |
| − | *VU+ STB | + | *Power off VU+ STB |
| − | * | + | *Remove all USB devices from the box |
| − | *USB Stick | + | *Plug-in the USB Stick into Vu+ Box |
| − | *VU+ STB | + | *Turn on the VU+ STB |
| − | *Update | + | *Firmware Update will start automatically |
| − | * | + | *Wait for the VFD to display "Finished ... please reboot" |
| − | *USB Stick | + | *Unplug the USB Stick from the box |
| − | *VU+ STB | + | *Power off the VU+ STB , and restart it again |
| − | == | + | == How to upgrade the Vu+ Solo image via USB == |
| − | * | + | *Save the image on the PC (USB version) |
| − | * | + | *Unzip files |
| − | *USB | + | *Format USB flash drive with the file system FAT,or FAT32 |
| − | * | + | *Create on the stick : Directory/vuplus/duo |
| − | * | + | *Copy to the stick the 3 files into :Directory/vuplus/duo |
| − | *VU+ STB | + | *Power off VU+ STB |
| − | * | + | *Remove all USB devices from the box |
| − | *USB Stick | + | *Plug-in the USB Stick into Vu+ Box |
| − | *VU+ STB | + | *Turn on the VU+ STB |
| − | *Update | + | *Firmware Update will start automatically |
| − | * | + | *The Standby LED will be red and if the USB stick detected ,the LEDs lights up |
| − | * | + | *If the Standby LED is green, the flashing process is finished, then you can unplug the USB stick from the box |
| − | *VU+ STB | + | *Power off the VU+ STB , and restart it again |
| − | == | + | == How to upgrade the Vu+ image via Serial Port == |
Manchmal kommt es vor, das wir die Box nur noch via serielles flashen zum laufen bekommen. Dafür benötigen wir dann die *.nfi Datei und das Vu+ Util. <br> | Manchmal kommt es vor, das wir die Box nur noch via serielles flashen zum laufen bekommen. Dafür benötigen wir dann die *.nfi Datei und das Vu+ Util. <br> | ||
Version vom 3. April 2012, 13:01 Uhr
To equip your Vu + box with a different, and new image, you need as we call it "Image". There are 2 versions of images ,the USB one, and serial flash (NFI).
Inhaltsverzeichnis
How to upgrade the Vu+ Ultimo image via USB
- Save the image on the PC (USB version)
- Unzip files
- Format USB flash drive with the file system FAT,or FAT32
- Create on the stick : Directory/vuplus/ultimo
- Copy to the stick the 4 files into :Directory/vuplus/ultimo
- Power off VU+ STB
- Remove all USB devices from the box
- Plug-in the USB Stick into Vu+ Box
- Turn on the VU+ STB
- Press the button "-" on front of the Ultimo
- Wait for "Finished, Removing USB" message
- Unplug the USB Stick from the box
- Power off the VU+ STB , and restart it again
How to upgrade the Vu+ Uno image via USB
- Save the image on the PC (USB version)
- Unzip files
- Format USB flash drive with the file system FAT,or FAT32
- Create on the stick : Directory/vuplus/uno
- Copy to the stick the 4 files into :Directory/vuplus/uno
- Power off VU+ STB
- Remove all USB devices from the box
- Plug-in the USB Stick into Vu+ Box
- Turn on the VU+ STB
- Press the button "-" on front of the Uno
- Wait for "Finished, Removing USB" message
- Unplug the USB Stick from the box
- Power off the VU+ STB , and restart it again
How to upgrade the Vu+ Duo / Vu+ Duo LE image via USB
- Save the image on the PC (USB version)
- Unzip files
- Format USB flash drive with the file system FAT,or FAT32
- Create on the stick : Directory/vuplus/duo
- Copy to the stick the 3 files into :Directory/vuplus/duo
- Power off VU+ STB
- Remove all USB devices from the box
- Plug-in the USB Stick into Vu+ Box
- Turn on the VU+ STB
- Firmware Update will start automatically
- Wait for the VFD to display "Finished ... please reboot"
- Unplug the USB Stick from the box
- Power off the VU+ STB , and restart it again
How to upgrade the Vu+ Solo image via USB
- Save the image on the PC (USB version)
- Unzip files
- Format USB flash drive with the file system FAT,or FAT32
- Create on the stick : Directory/vuplus/duo
- Copy to the stick the 3 files into :Directory/vuplus/duo
- Power off VU+ STB
- Remove all USB devices from the box
- Plug-in the USB Stick into Vu+ Box
- Turn on the VU+ STB
- Firmware Update will start automatically
- The Standby LED will be red and if the USB stick detected ,the LEDs lights up
- If the Standby LED is green, the flashing process is finished, then you can unplug the USB stick from the box
- Power off the VU+ STB , and restart it again
How to upgrade the Vu+ image via Serial Port
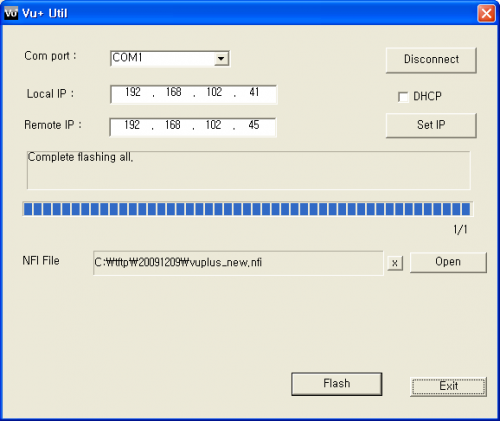
Manchmal kommt es vor, das wir die Box nur noch via serielles flashen zum laufen bekommen. Dafür benötigen wir dann die *.nfi Datei und das Vu+ Util.
Das Vu+ Util zum seriellen flashen bekommen wir im vuplus-support.org Forum
- Image am PC abspeichern (nfi Variante)
- Datei entpacken
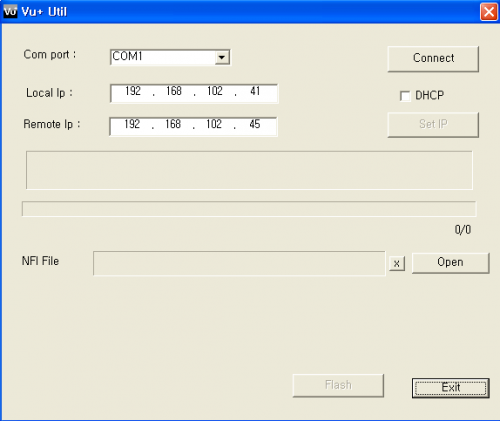
- Vu+ Util starten
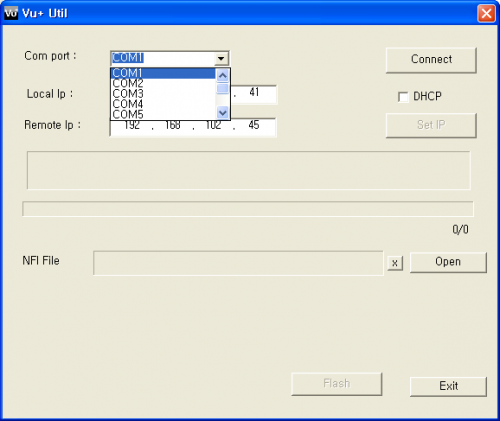
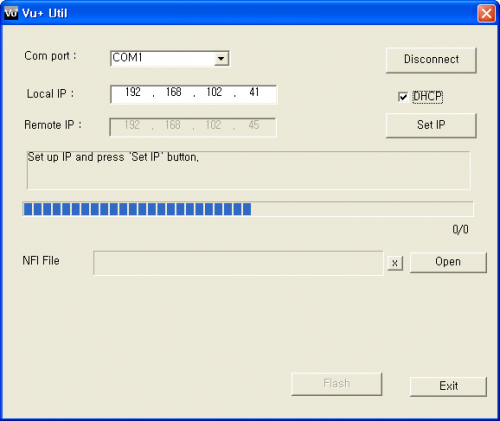
- Deinen COM Port auswählen
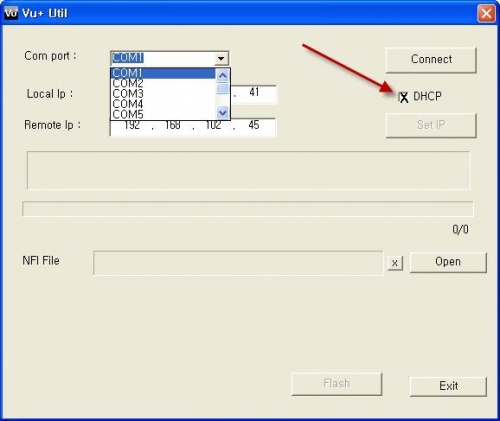
- Häckchen bei DHCP wenn du noch keine IP der VU+ vergeben hast
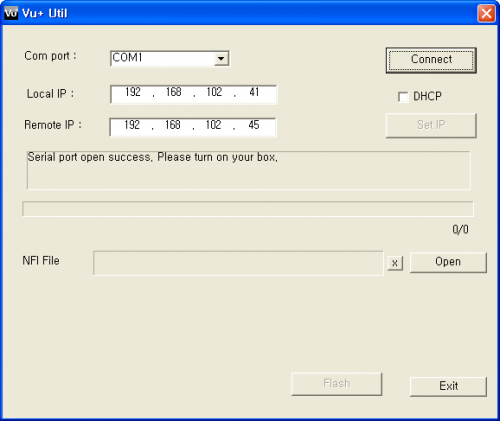
- dann auf Connect Button klicken
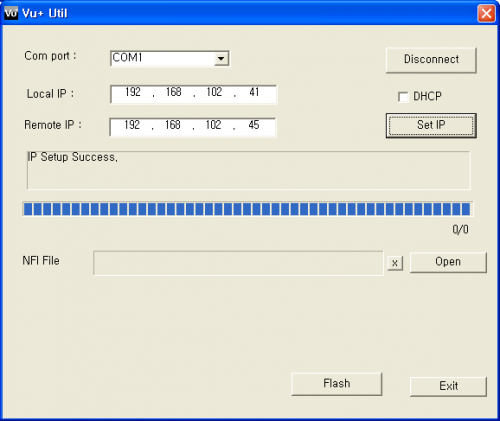
- nun solltest du “Serial port open success. Please turn on your box.” sehen, also VU+ am Netzschalter einschalten und da DHCP gesetzt ist, als nächstes auf Set IP Button klicken
- nun siehst du " IP Setup Success" im VU+ Util
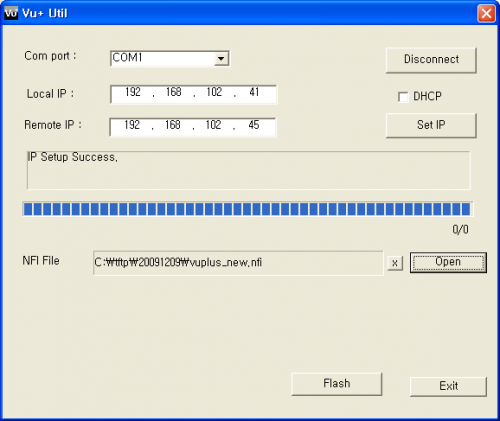
- jetzt das *.nfi File auswählen. Wir empfehlen natürlich das VTi Image
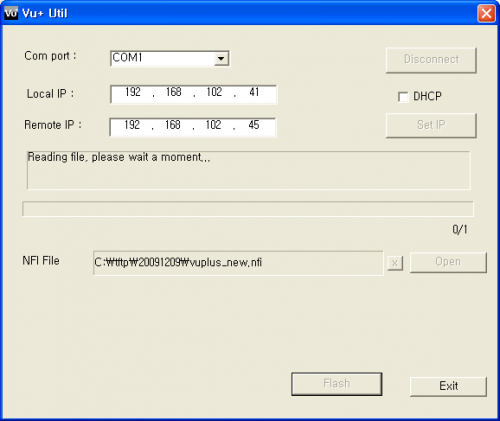
- und danach auf den Flash Button Klicken. Im VU+ Util steht dann "Reading file,please wait a moment..."
- danach kommt "flashing process is completed"
- Nun ist das Update fertig. Ihr könnt mit klick Disconnect und dann auf Exit Button das VU+ Util beenden . VU+ nun über die Power Taste neu Starten
